Many Urdu speakers first learn how to type in English, and therefore have trouble adjusting to the standard Urdu keyboard layout. The same applies to many of the speakers of languages that use variations of the Arabic script. Some people adjust to the standard layout of the language, but others may prefer an alternative that is more convenient and easier to learn based on their experience using a QWERTY keyboard. As one of those people, I downloaded the Microsoft Keyboard Layout Creator (MSKLC), a really useful tool that allows users to design custom keyboard layouts by assigning different Unicode characters to each key. I used it to create an optimized and comprehensive layout for Urdu, which also has the full capacity to type in Persian, Punjabi (Shahmukhi), Arabic, and other languages.
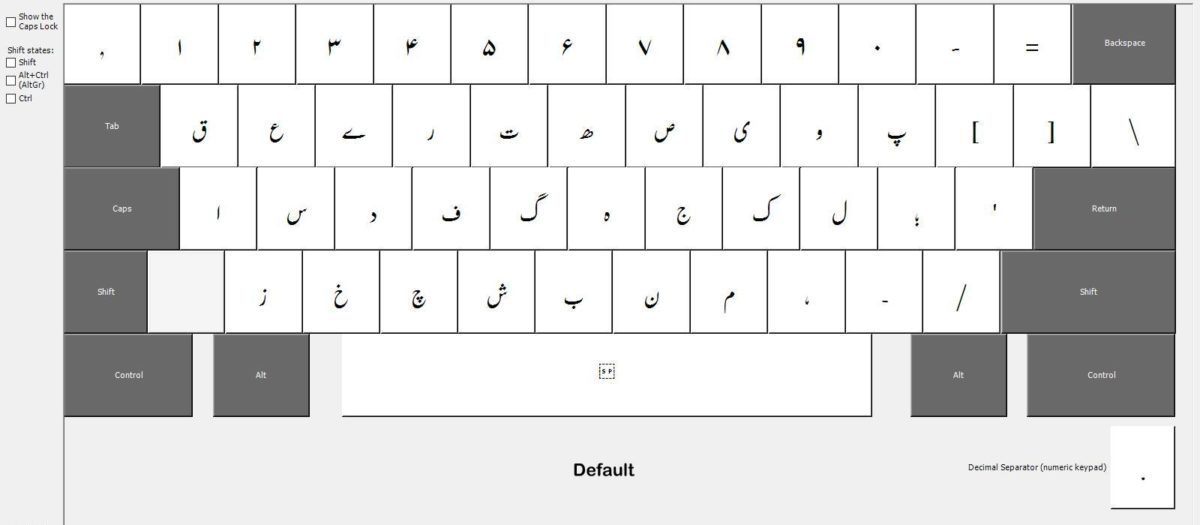
The main idea behind my keyboard design is to make it easy for someone who already knows how to type in English. Therefore, “p” corresponds to “پ” (“pe”), “k” corresponds to “ک” (“kaaf”), “l” corresponds to “ل” (“laam”), etc. Of course, there cannot be a perfect correspondence between Urdu and English because some letters exist in both languages that don’t have an equivalent in the other. Being able to assign more letters to the “shift” state helps with this because we don’t have to worry about upper and lower cases for languages that use the Arabic script. Thus, “t” corresponds to “ت” but “shift”+“t” corresponds to the less common retroflex “ٹ”. I followed an analogous pattern for retroflex “d” and “r”. For a few letters, I simply had to pick whichever keys were still left, but the majority of keys are intuitively placed. Although there is an accessible keyboard layout for Urdu that follows this phonetic approach (“CRULP Urdu Phonetic Keyboard Layout”), mine has a few advantages. It includes characters specific to Arabic, making this keyboard easily usable for typing in both Urdu and Arabic. Plus, it makes use of every key, allowing for more special characters and punctuation marks.
As I mentioned, this keyboard is also compatible with Arabic, which requires different variations of certain letters. I assigned “ك”, the Arabic version of “kaaf”, to “alt+ctrl”+“k”.This is convenient because it is the same key as the Urdu/Persian version of “kaaf”, in a different state. Similarly, the Arabic “ya” is “alt+ctrl”+“i”, whereas Urdu/Persian “ya” is just “i”. Another feature of this keyboard layout is the extended assortment of special characters, diacritical marks, and punctuation marks that I included. Most of these are in the “shift” or “alt+ctrl” states because they are used less often. The bottom row of keys in those states, for example, includes all the short vowels used in Urdu, Persian, and Arabic. Here are some highlights of the special characters and punctuation marks:
- The takhallus sign used to indicate the name of a poet is “alt+ctrl”+“z”.
- The sign used to indicate a line of poetry is “alt+ctrl”+“e”.
- The sanah sign used to indicate a year is “shift”+“7”.
- The Bismillah ligature is “alt+ctrl”+“o”.
- The reverse question mark is “shift”+“/”, replacing the regular version.
The images below show how characters are assigned to each key in the three states. For some computers, you only have to press “alt” for the “alt+ctrl” state instead of both keys. You can download and install this layout on your own Windows computer to use it and even to edit it yourself if you have MSKLC. Click here to download the folder with the necessary files. Installing it just requires running the file called “setup” after you have downloaded and unzipped the folder. Once the keyboard is installed, you can switch between it and the regular QWERTY keyboard by pressing “alt”+“shift”. I hope this Urdu keyboard layout is helpful, and comments and suggestions for improving it are appreciated.


Comments
2 responses to “A Comprehensive Keyboard Layout for Urdu”
Way trendy, some valid points! I appreciate you making this post available, the remainder of the website is also high
quality. Have a enjoyable.
what to do next? after installation of that file.